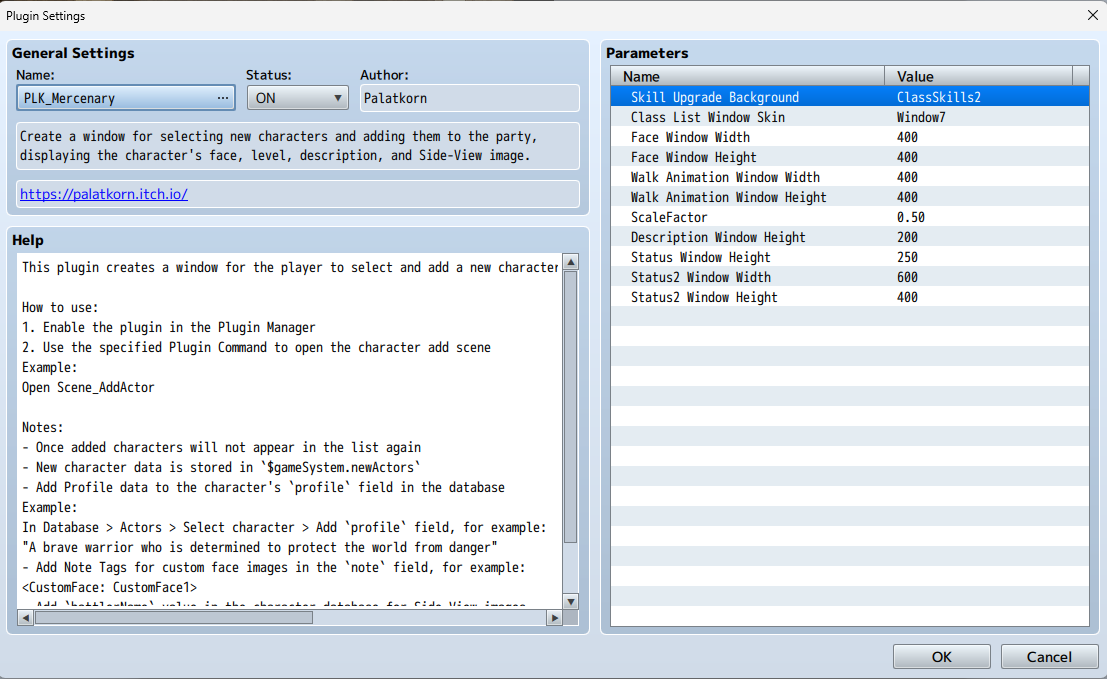
PLK_Mercenary
A downloadable tool
Use /FS[ ] or other plugins to set the size of the description.
If you want to show another face but don't set it, it will use the normal face image instead.
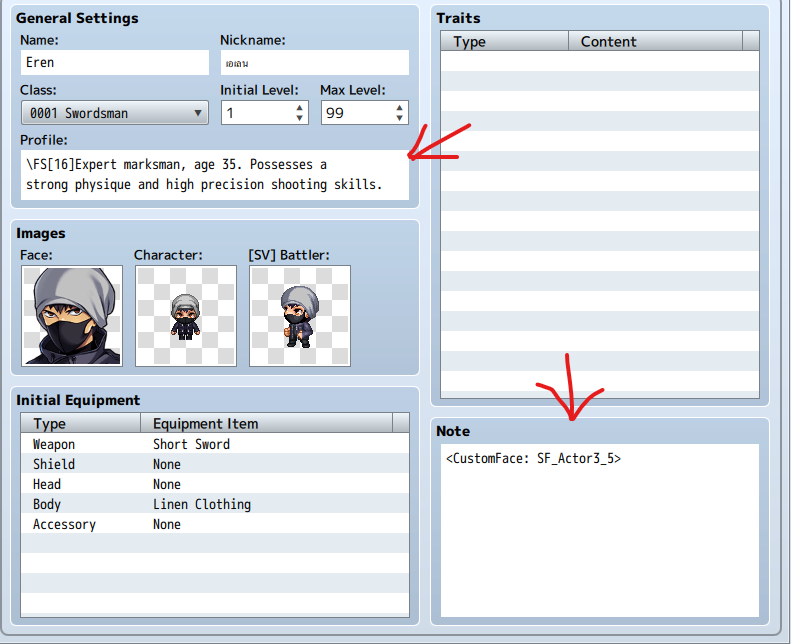
Name the battle file to match the character's real name in the game.

How to Set Up Side-View Battler Files in RPG Maker MZ
Below is a clear explanation of how to configure Side-View Battler images in RPG Maker MZ for use with the PLK_Mercenary Plugin. The plugin relies on the correct setup of Side-View Battler files and database settings to function properly.
Steps for Setting Up
1. Folder and File Preparation
| Task | Details |
| Create Folder | Ensure the folder img/sv_actors/ exists in your project. If it doesn’t exist, create it manually. |
| File Format | Save Side-View Battler images as .png files. Each battler frame should follow the standard size (144x144 pixels per frame). |
| File Naming | Name the files to match the character’s battlerName in the Database. For example, if the battlerName is Hero, the file must be Hero.png. |
| File Location | Place all Side-View Battler images in the folder: img/sv_actors/. |
Example File Setup:
| File Name | Location |
| Hero.png | img/sv_actors/Hero.png |
| Mage.png | img/sv_actors/Mage.png |
| Warrior.png | img/sv_actors/Warrior.png |
2. Database Configuration
| Field | Action |
| Battler Name | Open the Database (F9), go to the Actors tab, and enter the file name (without .png) in the Battler Name field. |
| Battler Hue | Adjust the Battler Hue to apply a color tint to the battler. Default value is 0. |
Example Configuration for a Character:
| Field | Value | Explanation |
| Name | Hero | The character’s name. |
| Battler Name | Hero | Matches the file name in img/sv_actors (e.g., Hero.png). |
| Battler Hue | 0 | No color tint. |
| Profile | "A brave hero determined to protect the world." | A brief description of the character. |
| Note | <CustomFace: HeroFace> | Optional: Specifies a custom face image (stored in img/pictures/). |
3. Plugin Configuration
| Task | Details |
| Enable Plugin | Open Plugin Manager (F10), add the PLK_Mercenary.js file, and set its status to ON. |
| Configure Parameters | Adjust parameters like Background, WindowSkin, and window dimensions (e.g., FaceWindowWidth, WalkWindowHeight) in the Plugin Manager. |
| Background | Select a background image for the character selection screen (e.g., Actor3_7). Must be in img/pictures/. |
| WindowSkin | Choose a custom window skin for plugin windows. Must be in img/system/. |
4. Using Plugin Commands
| Command | Details |
| openAddActor | Opens the Scene_AddActor screen where players can select and add characters to the party. |
| How to Use | Add a Plugin Command in an event via the Event Editor to call the command. |
5. Testing and Verifying
| Task | Details |
| Test the Game | Playtest the game and use the openAddActor Plugin Command to open the character selection scene. |
| Check Battler Images | Ensure Side-View Battler images display correctly for each character in the selection scene. |
| Check Console for Errors | Open the Developer Tools (F8) while the game is running to check for any warnings or errors related to missing files or incorrect file names. |
Troubleshooting Guide
| Issue | Solution |
| Side-View Battler image not showing | Verify that the file name matches the battlerName in the Database and that the file exists in img/sv_actors/. |
| File format issues | Ensure all Side-View Battler files are in .png format. |
| Plugin Command not working | Confirm that the plugin is enabled in Plugin Manager and the correct command (openAddActor) is used in the Event Editor. |
| Console errors | Open the Developer Tools (F8) and check the console for specific error messages related to the issue. |
Example Table for Folder and Database Setup
| Character Name | File Name | Folder Location | Battler Name in Database | Custom Face (Optional) |
| Hero | Hero.png | img/sv_actors/Hero.png | Hero | <CustomFace: HeroFace> |
| Mage | Mage.png | img/sv_actors/Mage.png | Mage | <CustomFace: MageFace> |
| Warrior | Warrior.png | img/sv_actors/Warrior.png | Warrior | <CustomFace: WarriorFace> |
Summary
- Prepare the Folder:
- Ensure all Side-View Battler images are placed in
img/sv_actors/and named correctly (e.g.,Hero.pngfor a character withbattlerName: Hero).
- Ensure all Side-View Battler images are placed in
- Configure the Database:
- Set the
battlerNamefield in the Database to match the file name of the battler (without the.pngextension).
- Set the
- Enable and Configure the Plugin:
- Use the Plugin Manager to enable PLK_Mercenary and configure its parameters as needed.
- Test and Verify:
- Playtest the game, use the
openAddActorPlugin Command, and check that Side-View Battler images display correctly in the selection scene.
- Playtest the game, use the
If you encounter any issues or have further questions, feel free to ask for more assistance!
* Terms of Use * No duplication or distribution is permitted. Can be used in commercial games I ask you to specify "Palatkorn" in your game credits only
Purchase
In order to download this tool you must purchase it at or above the minimum price of $2 USD. You will get access to the following files:
Leave a comment
Log in with itch.io to leave a comment.